LOST WAVE

Pokémon (12):
1 Manaphy S12a (protect bench)
1 Radiant Greninja (beatdown)
2 Zamazenta S11a (beatdown)
2 Cramorant S11 (beatdown)
2 Sableye S11 (beatdown)
4 Comfey S12a (draw)
Trainer (38):
4 Colress Experiment (draw)
2 Boss’ Orders (control)
2 Raihan (accelerate)
4 Mirage Gate (accelerate)
4 Escape Rope (control)
3 PokéGear 3.0 (search)
2 Super Rod (retrieval)
3 Switch Cart (retreat)
4 Fog Crystal (search)
4 Nest Ball (search)
3 Switch
3 Artazon Town (search)
Energy (10):
3 Psychic Energy
3 Water Energy
4 Metal Energy
STRATEGY:
Start with Comfey and use Flower Selecting to draw and fill the Lost Zone. Attack with Cramorant on the first turn. Make sure to be able to use Mirage Gate on the second turn to fuel Zamazenta or Radiant Greninja. The latter one is formidable in Lost Zone Box mirror matches once Manaphy has been knocked out. Continue to draw and fill the lost zone to activate Lost Mine. Lost Mine is used to fix numbers on multi-prize Pokémon and can also be used to hunt the bench with Radiant Greninja in Lost Box mirror matches.
CARD SHARK:
Pokémon:
2 Zamazenta: This card is used as one of the main attackers. When a Pokémon has been knocked out on the opponent’s last turn Retaliate deals a solid 220 damage to the defender. Metal Shield boosts the hit-points of Zamazenta by reducing damage received in an attack by 30.
2 Cramorant: This Pokémon attacks for free on the first turn due to the Lost Zone mechanic and provides some early game pressure.
1 Radiant Greninja: This card serves as a draw engine in addition to Flower Selecting. It also ensures that there are some basic energies in the discard pile to be used with Raihan. In addition Radiant Greninja provides an awesome snipe attack to hunt down support Pokémon on the bench.
1 Manaphy: Manaphy is used to protect the bench from Radiant Greninja, Regieleki, and other bench-sniper.
2 Sableye: Lost Mine allows you to place twelve damage counters on the opponent's Pokémon in any way you like once you have ten cards in the lost zone. This allows the deck to hunt down benched consistency Pokémon to draw two prizes at once. In addition Lost Mine can also fix numbers for Zamazenta.
4 Comfey: Flower Picking is the main draw engine in this deck and can draw two to four cards each turn with the switch and retreat items used in this deck. In addition Flower Picking fills the lost zone and thus activates Lost Supply on Cramorant within one turn and the precondition to use Mirage Gate in one more turn.
Supporter:
4 Colress' Experiment: This card draws five cards from the top of the deck. You can keep three of them and send the other two cards into the lost zone. This is the main draw supporter in this deck.
2 Raihan: Provided that all attackers can be knocked out with ease this card provides needed deck search in addition to energy acceleration from the discard pile.
2 Boss Order: Gust is needed in almost all decks and enables the deck to up trade against Pokémon Vstar decks.
Items and Stadium:
4-4 Nest Ball, Fog Crystal, and Artazon Town: Both item cards can be used to search out Basic Pokémon. Nest Ball is the most universal Pokémon search card. Fog Crystal is limited to search for Basic Psychic Pokémon but can also be used to search for Basic Psychic energy. Artazon Town can search out any Basic Pokémon other than Radiant Greninja in this deck.
4-3-3 Escape Rope, Switch Cart, and Switch: Comfey’s Flower Selecting is the main draw engine. Thus, the deck wants to use two Comfey per turn to draw and fill the lost zone. Switch Cart and Switch are stable switch cards and Escape Rope can be used as a means to also switch out the defender. This comes in handy when dealing with Klefki.
4 Mirage Gate: This card provides energy acceleration for Zamazenta and Radiant Greninja once there are seven cards in the lost zone. This provides some needed energy acceleration for the main attackers and also serves as a means to thin the deck to make Fleet Footed and Flower Selecting more effective.
3 PokéGear 3.0: Used to search for supporter cards to maintain a stable card flow.
2 Super Rod: Retrieve discarded Pokémon and energy cards.
Energy:
4-3-3 Metal, Psychic and Water Energy: The deck runs an even break of Water and Psychic Energy to increase the effectiveness of Mirage Gate in addition to four Metal energy cards to fuel Zamazenta.
VISUAL DECKLIST:
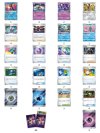

Pokémon (12):
1 Manaphy S12a (protect bench)
1 Radiant Greninja (beatdown)
2 Zamazenta S11a (beatdown)
2 Cramorant S11 (beatdown)
2 Sableye S11 (beatdown)
4 Comfey S12a (draw)
Trainer (38):
4 Colress Experiment (draw)
2 Boss’ Orders (control)
2 Raihan (accelerate)
4 Mirage Gate (accelerate)
4 Escape Rope (control)
3 PokéGear 3.0 (search)
2 Super Rod (retrieval)
3 Switch Cart (retreat)
4 Fog Crystal (search)
4 Nest Ball (search)
3 Switch
3 Artazon Town (search)
Energy (10):
3 Psychic Energy
3 Water Energy
4 Metal Energy
STRATEGY:
Start with Comfey and use Flower Selecting to draw and fill the Lost Zone. Attack with Cramorant on the first turn. Make sure to be able to use Mirage Gate on the second turn to fuel Zamazenta or Radiant Greninja. The latter one is formidable in Lost Zone Box mirror matches once Manaphy has been knocked out. Continue to draw and fill the lost zone to activate Lost Mine. Lost Mine is used to fix numbers on multi-prize Pokémon and can also be used to hunt the bench with Radiant Greninja in Lost Box mirror matches.
CARD SHARK:

Pokémon:
2 Zamazenta: This card is used as one of the main attackers. When a Pokémon has been knocked out on the opponent’s last turn Retaliate deals a solid 220 damage to the defender. Metal Shield boosts the hit-points of Zamazenta by reducing damage received in an attack by 30.
2 Cramorant: This Pokémon attacks for free on the first turn due to the Lost Zone mechanic and provides some early game pressure.
1 Radiant Greninja: This card serves as a draw engine in addition to Flower Selecting. It also ensures that there are some basic energies in the discard pile to be used with Raihan. In addition Radiant Greninja provides an awesome snipe attack to hunt down support Pokémon on the bench.
1 Manaphy: Manaphy is used to protect the bench from Radiant Greninja, Regieleki, and other bench-sniper.
2 Sableye: Lost Mine allows you to place twelve damage counters on the opponent's Pokémon in any way you like once you have ten cards in the lost zone. This allows the deck to hunt down benched consistency Pokémon to draw two prizes at once. In addition Lost Mine can also fix numbers for Zamazenta.
4 Comfey: Flower Picking is the main draw engine in this deck and can draw two to four cards each turn with the switch and retreat items used in this deck. In addition Flower Picking fills the lost zone and thus activates Lost Supply on Cramorant within one turn and the precondition to use Mirage Gate in one more turn.
Supporter:
4 Colress' Experiment: This card draws five cards from the top of the deck. You can keep three of them and send the other two cards into the lost zone. This is the main draw supporter in this deck.
2 Raihan: Provided that all attackers can be knocked out with ease this card provides needed deck search in addition to energy acceleration from the discard pile.
2 Boss Order: Gust is needed in almost all decks and enables the deck to up trade against Pokémon Vstar decks.
Items and Stadium:
4-4 Nest Ball, Fog Crystal, and Artazon Town: Both item cards can be used to search out Basic Pokémon. Nest Ball is the most universal Pokémon search card. Fog Crystal is limited to search for Basic Psychic Pokémon but can also be used to search for Basic Psychic energy. Artazon Town can search out any Basic Pokémon other than Radiant Greninja in this deck.
4-3-3 Escape Rope, Switch Cart, and Switch: Comfey’s Flower Selecting is the main draw engine. Thus, the deck wants to use two Comfey per turn to draw and fill the lost zone. Switch Cart and Switch are stable switch cards and Escape Rope can be used as a means to also switch out the defender. This comes in handy when dealing with Klefki.
4 Mirage Gate: This card provides energy acceleration for Zamazenta and Radiant Greninja once there are seven cards in the lost zone. This provides some needed energy acceleration for the main attackers and also serves as a means to thin the deck to make Fleet Footed and Flower Selecting more effective.
3 PokéGear 3.0: Used to search for supporter cards to maintain a stable card flow.
2 Super Rod: Retrieve discarded Pokémon and energy cards.
Energy:
4-3-3 Metal, Psychic and Water Energy: The deck runs an even break of Water and Psychic Energy to increase the effectiveness of Mirage Gate in addition to four Metal energy cards to fuel Zamazenta.
VISUAL DECKLIST:

Last edited:

